Ingredients:
2 gallons whole milk, cow, goat or sheep
1 pint cream
1 tsp calcium chloride with 1 tbs water (optional—make the curd set better with store-bought milk)
1 pkg yogurt culture starter
1 pkg direct-set mesophilic starter
1 tsp liquid rennet mixed with 1/4 c water
1 oz blue cheese blended with 1/4 c water
2 tbs kosher salt
Equipment:
2.5 gal stock pot
long metal spoon (the length of the depth of your pot)
long knife or cake spatula (the length of the depth of your pot)
thermometer
colander
lipped tray or cookie sheet
2 lb plastic or metal cheese mold (should hold about 1 quart by volume)
2′ square fine cheese cloth or a muslin dishtowel
2 plastic cheese mats or bamboo sushi mats
5 gallon food grade plastic bucket and lid
metal or wood wrack that fits in the bottom of the 5 gal bucket
Instructions:
Specialty cheese ingredients can be purchase at cheese supply places like CheeseMaking.com or HoeggerFarmYard.com, or a local DIY home arts store or possibly a co-op. Star San is available at NorthernBrewer.com, or a local beer supply store.
If you’re worried about making your first cheese (You can do it!!) check out this great 1-2-3 cheese basics from master home cheesemaker Ricki Carrol.
It’s best to start this entire process in the morning of a free day so you have plenty of time, as it takes 5 to 6 hours of intermittent attention. The first step is to wash and sanitize all the equipment. For things that fit into a stock pot, like the spoon, knife, cheese mold, cheese cloth, colander and mats, put them in the pot, fill with hot water, and boil for 10 minutes. Sanitize a tray or cookie sheet with a drop of bleach in a cup of water, rinse well with hot water, then set all the sterilized items on it to drain. For the 5 gallons bucket, wash in hot soapy water, rinse with one gallon of hot water with 1 tbs bleach, then rinse well with plain hot water. Wipe down your countertops with hot water and soap. If you hate bleach, try Star San, an acid based surface sanitizer used by beer brewers. It’s totally biodegradable and even safe for human consumption.
To start the cheese, add the milk and cream to the stock pot and warm the milk to 88 degrees. I do this by placing the pot in a sink full of 100 degree water and letting it slowly come to temp. I don’t like using the stove because heating on the stove can lead to scorching. Add more warm water to the sink if needed.

When the milk is at temp, sprinkle it with the yogurt and mesophilic starters, add the calcium chloride and blue cheese mixture, then stir well to dissolve. Cover the pot and allow the milk to mature for 60 minutes. This process allows the starter bacteria to grow and begin to acidify the milk. I like to put a fluffy bath towel over the whole sink to keep the temp even.
After 1 hour, check that the temp of the milk is still 88 degrees. Add warm water if needed to the sink. Add the diluted rennet to the milk, gently stirring for one minute. Cover the pot and let rest undisturbed for at least 1 hour or until the curd is set. You’ll know that the curd is set because it will be one solid jello-like mass that “breaks” when you press it. If you put an impeccably clean finger into the milk and it comes out looking like yogurt, it’s not quite ready. But if it breaks into more distinct chunks, even if they are soft, then it’s ready. When in doubt, let it sit for 15 more minutes.
With a sterilized long knife cut the milk into 1/2 inch curds by slicing a grid pattern vertically through the milk, from the surface to the bottom and side to side of the pan. It will look like a checker board of long vertical curds. Now take a knife and cut the curds at a 45 degree angle, slicing down along the side of the pot from top to bottom. Give the pot a quarter turn and do it again. Keep turning until you’ve gone all the way around. Don’t worry, if you missed a curd just cut it during the stirring process. Let the curds rest for 15 minutes.
Check the whey temp to be sure you’re at 88 degrees. With a sterilized spoon, GENTLY give the curds a stir to keep them from clumping, but try not to break them apart. Let rest for 5 minutes, then stir again. Stir every 5 minutes for one hour. This process allows the whey to slowly leave the curds. After an final stir, let the curds rest for 5 more minutes.

Line a colander with doubled up cheese cloth. Pour off the whey and gently pour the curds into the colander to drain. Drain for 10 minutes. Return the curds to the colander. Sprinkle with two tablespoons of salt and mix the curds with your hands so they don’t stick together. Let sit for another 10 minutes.
Now it’s time to form the cheese. On the rack lay a cheese or bamboo mat and top with the cheese mold. Fill the mold with curds. If they don’t all fit, let the curds set for 10 minutes then pile on more. Avoid pressing them down if you can. You want an open texture to the curds, which will aid in the blue veining process. When they are all in, top with another mat. Flip the cheese by sandwiching the two cheese mats on either side of the cheese mold. Flip the cheese every 15 minutes for two hours, then let drain overnight on the countertop.
The next day remove the cheese from the mold, sprinkle all the surfaces with kosher salt. Set a rack, mat and cheese inside the 5 gallon bucket, topped with a lid left cracked an inch. Set in a basement corner on the floor (the walls and floor will be pretty cool.) If you have no basement, try a closet with an exterior wall. Flip the cheese daily for 3 days, sprinkling the surfaces with salt each day. It’s OK that the salt falls off. Drain any accumulated whey from the bucket daily. After 3 days, continue flipping the cheese daily but do not salt any longer. After a week, flip the cheese every 4 or 5 days.
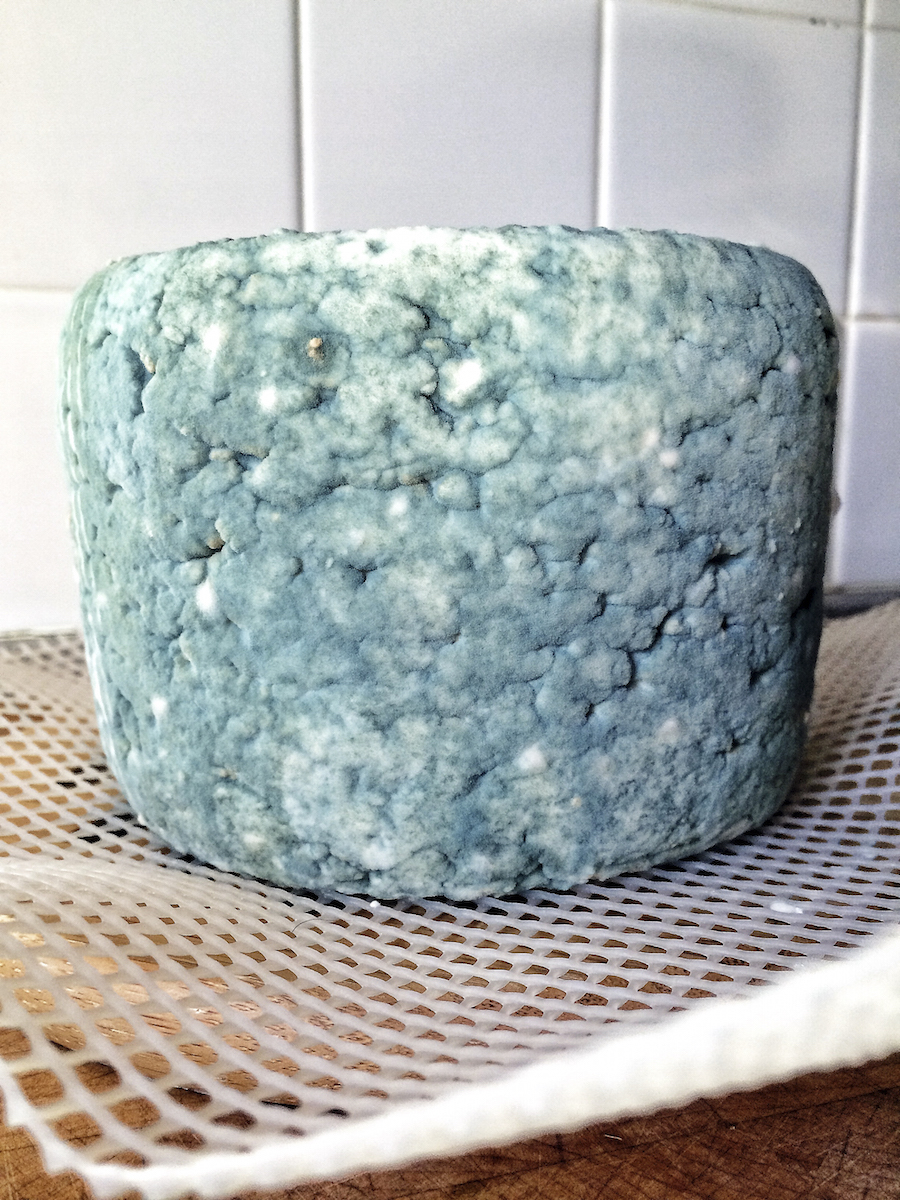
When the blue mold appears on the outside of the cheese, which should take about two weeks, it’s time to poke holes in the cheese. Sterilize a long metal kabab skewer or ice pick and poke 3 to 4 dozen holes in the cheese from top to bottom. Penicillin requires air to grow and this will allow oxygen into the interior of the cheese, where it will form the classic blue veins. Return the cheese to the bucket with the rack and cheese mat. Continue to flip every 4 to 5 days or the cheese will go all pear-shaped (as mine did).
After a month you’ll see both blue, red and possibly white mold on the surface of the cheese. With a clean cake frosting spatula, gently scrape all the mold off the cheese and return it to the bucket cave. Scrape the mold at least once a month. After 2.5 months, scrape the cheese a final time and wrap tightly in cheese wrap or foil. Place in the bottom of the refrigerator. The cheese will continue to age. For a mild cheese, eat immediately. For a stronger cheese, let age for 2+ more months, up to 6 months more.
Makes 2 pounds of cheese.